Alright! This was a little lab that I did to connect an Azure vNet to an AWS VPC. I’ll walk you through doing a complete from scratch deployment. At the bottom of the article, I included a list of all of the individual resources that I used and the relevant links so you could learn more about that cloud technology. Due to how the VPNs deploy, we’ll need to jump between the Azure Portal and the AWS console.
Also, the VNG is one of the resources included in an Azure Students subscription, so be sure to take advantage of that!
Azure
The first thing that you’ll want to deploy is the Azure Virtual Network Gateway (VNG). The average deployment takes about 30 minutes. Traditionally, a VPN gateway is a specific type of virtual network gateway that sends encrypted traffic between an Azure virtual network over the public Internet to an on-premises location. We are going to connect it to another cloud instead of on-prem.
Create virtual network gateway
Navigate to the Azure Portal
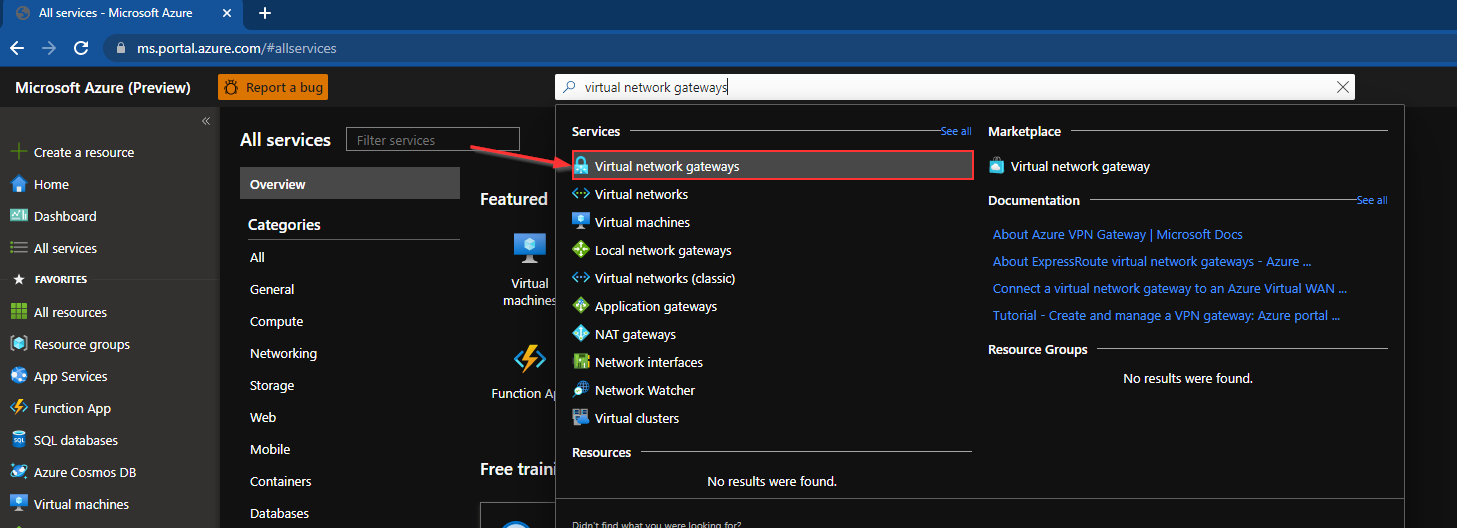
Search for and select Virtual network gateway once the page opens press create
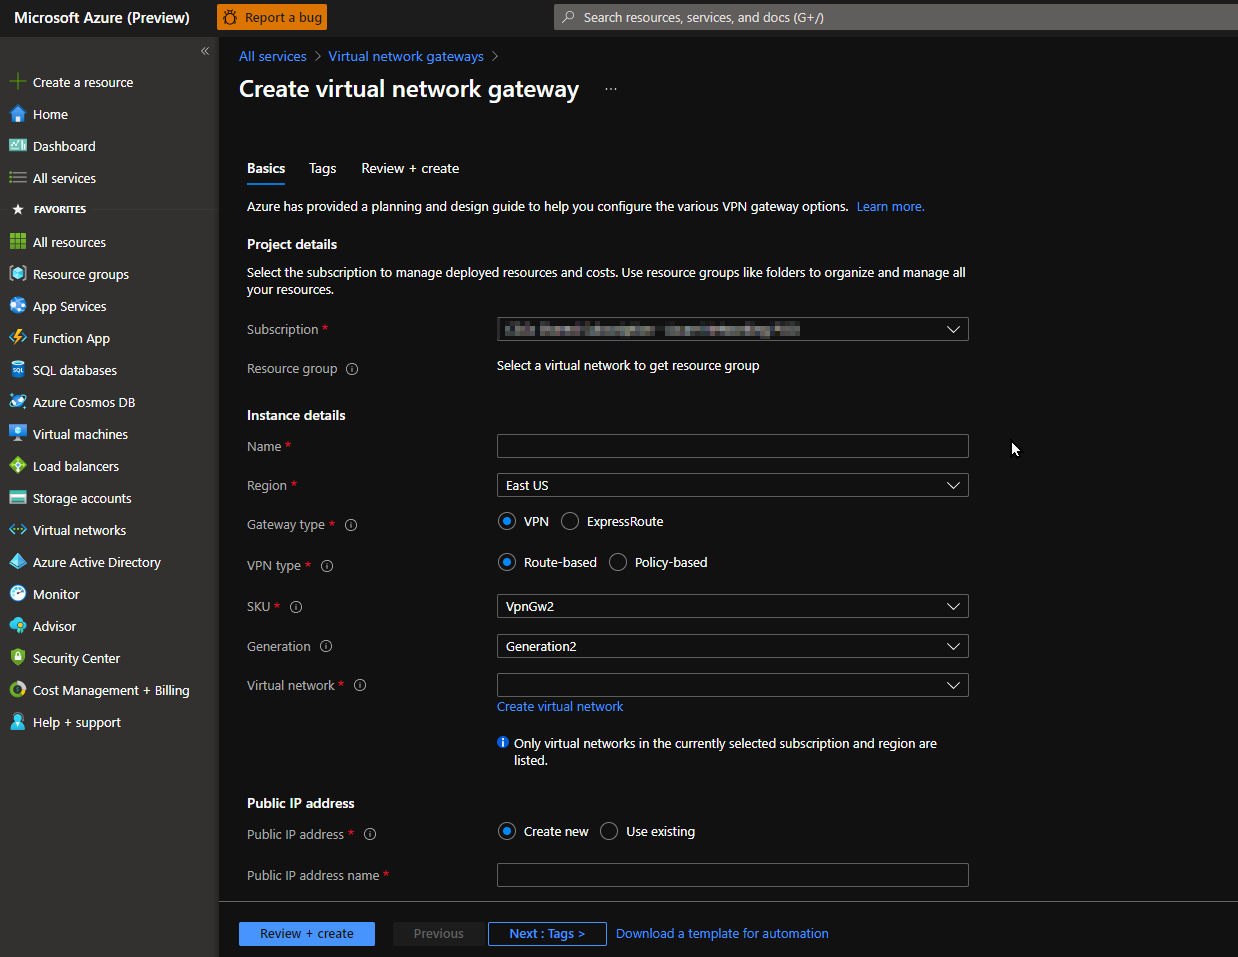
```azure cli
Subscription: [YOUR-SUBSCRIPTION]
Resource Group: [YOUR-RESOURCEGROUP]
Instance details
- Name: VpnGw
- Region: East US 2
- Gateway Type: VPN
VPN type: Route-based
Generation: Generation2
Virtual Network: Create virtual network
Name: vNet-1
- Resource Group: rg-1
- Address space: 10.0.0.0/16
- Subnets:
- default: 10.0.0.0/24
- Gateway subnet address range: 10.0.1.0/24 <–(This will populate once you create the vNet)
Public IP address
- Public IP address: Create new
- Public IP address name: VpnGw-PublicIp
- Public IP address SKU: Basic
- Assignment: Dynamic
- Enabled active-active: Disabled
- Configure BGP: Disabled
```
First, we’ve created a Resource Group, the container that holds related resources for an Azure solution. We’ve also created a vNet in the 10.0.0.0/16 address space as well as a dedicated GatewaySubnet. Currently, we’ve left the BGP selector disabled. We’ll configure BGP after we’ve created our AWS resources.
Before leaving the Azure platform you should see the Public IP address created fairly quickly.
AWS
Now we are onto the AWS console. Here we’ll be creating our VPC and the VPN gateway. We can use the resource details we generated in Azure to create our Customer gateway. A customer gateway provides information to AWS about your customer gateway device. In our case, it’s the VNG.
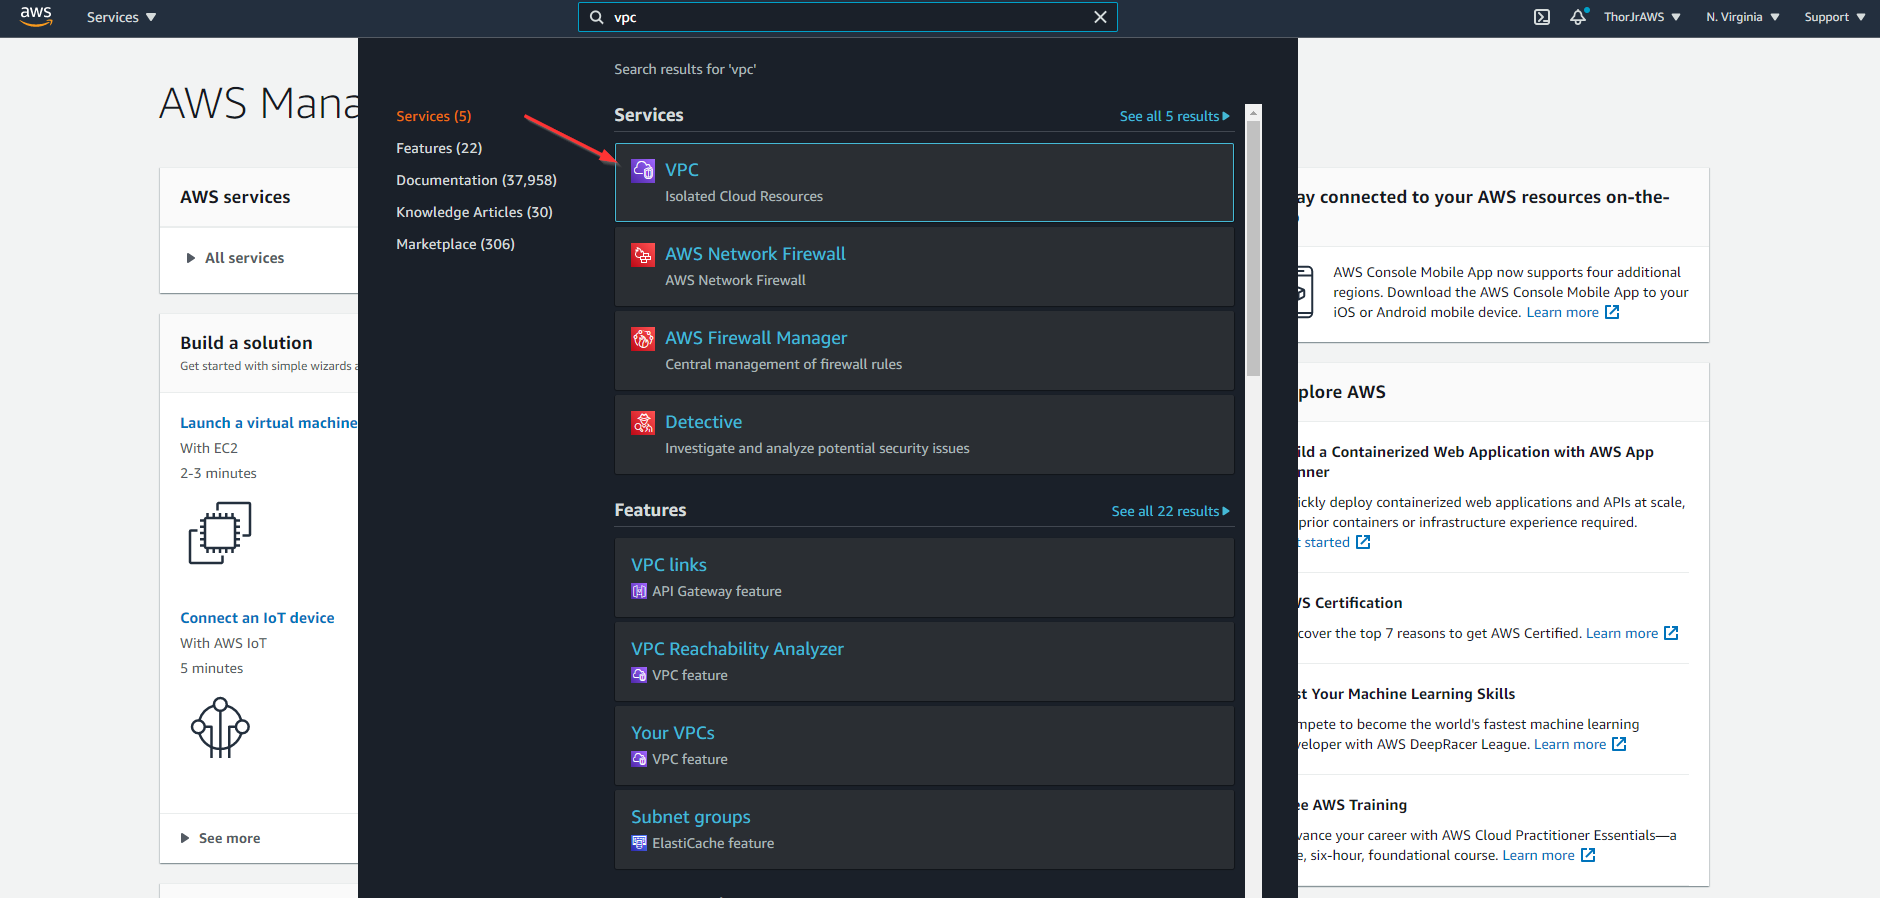
Navigate to your AWS Console.
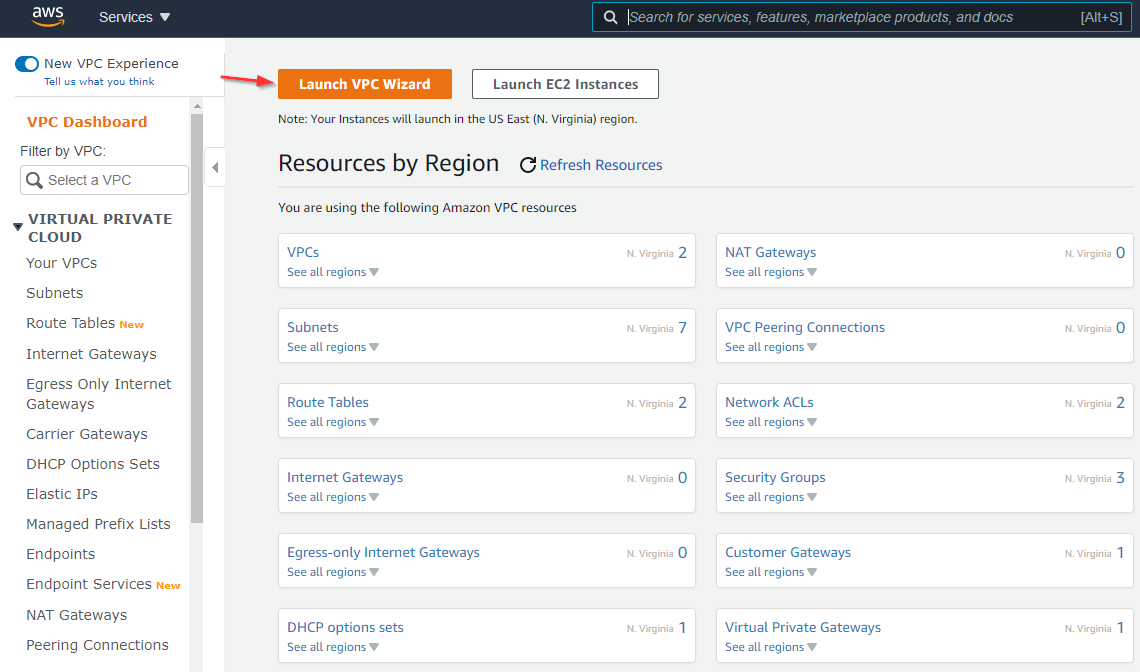
Search for and select VPC once the page opens press Launch VPC Wizard
The launch wizard has four steps. We are going to launch a VPC with a private subnet and VPN access. We’ll use a 172 address space, so it’s easy to tell with resources are in AWS and which are in Azure. Lastly, we’ll need to put in the Public IP of the Azure VNG.
```aws cli
Step 1: Select a VPC Configuration
- Select the fourth option: VPC with a Private Subnet Only and Hardware VPN Access
Step 2: VPC with a Private Subnet Only and Hardware VPN Access
- IPv4 CIDR block: 172.16.0.0/16
- IPv6 CIDR block: No IPv6 CIDR Block
- VPC name: vpc-1
- Private subnet’s IPv4 CIDR: 172.16.0.0/24
- Availability Zone: No Preference
- Private subnet name: Private subnet
Service endpoints: Left blank
- Enable DNS hostnames: Yes
- Hardware tenancy: Default
Step 3:
- Customer Gateway IP:[AZURE-PUBLIC-IP] <— From the Azure VNG
- Customer Gateway name: Azure
- VPN Connection name: AWS-to-Azure
- Routing Type: Dynamic (requires BGP)
```
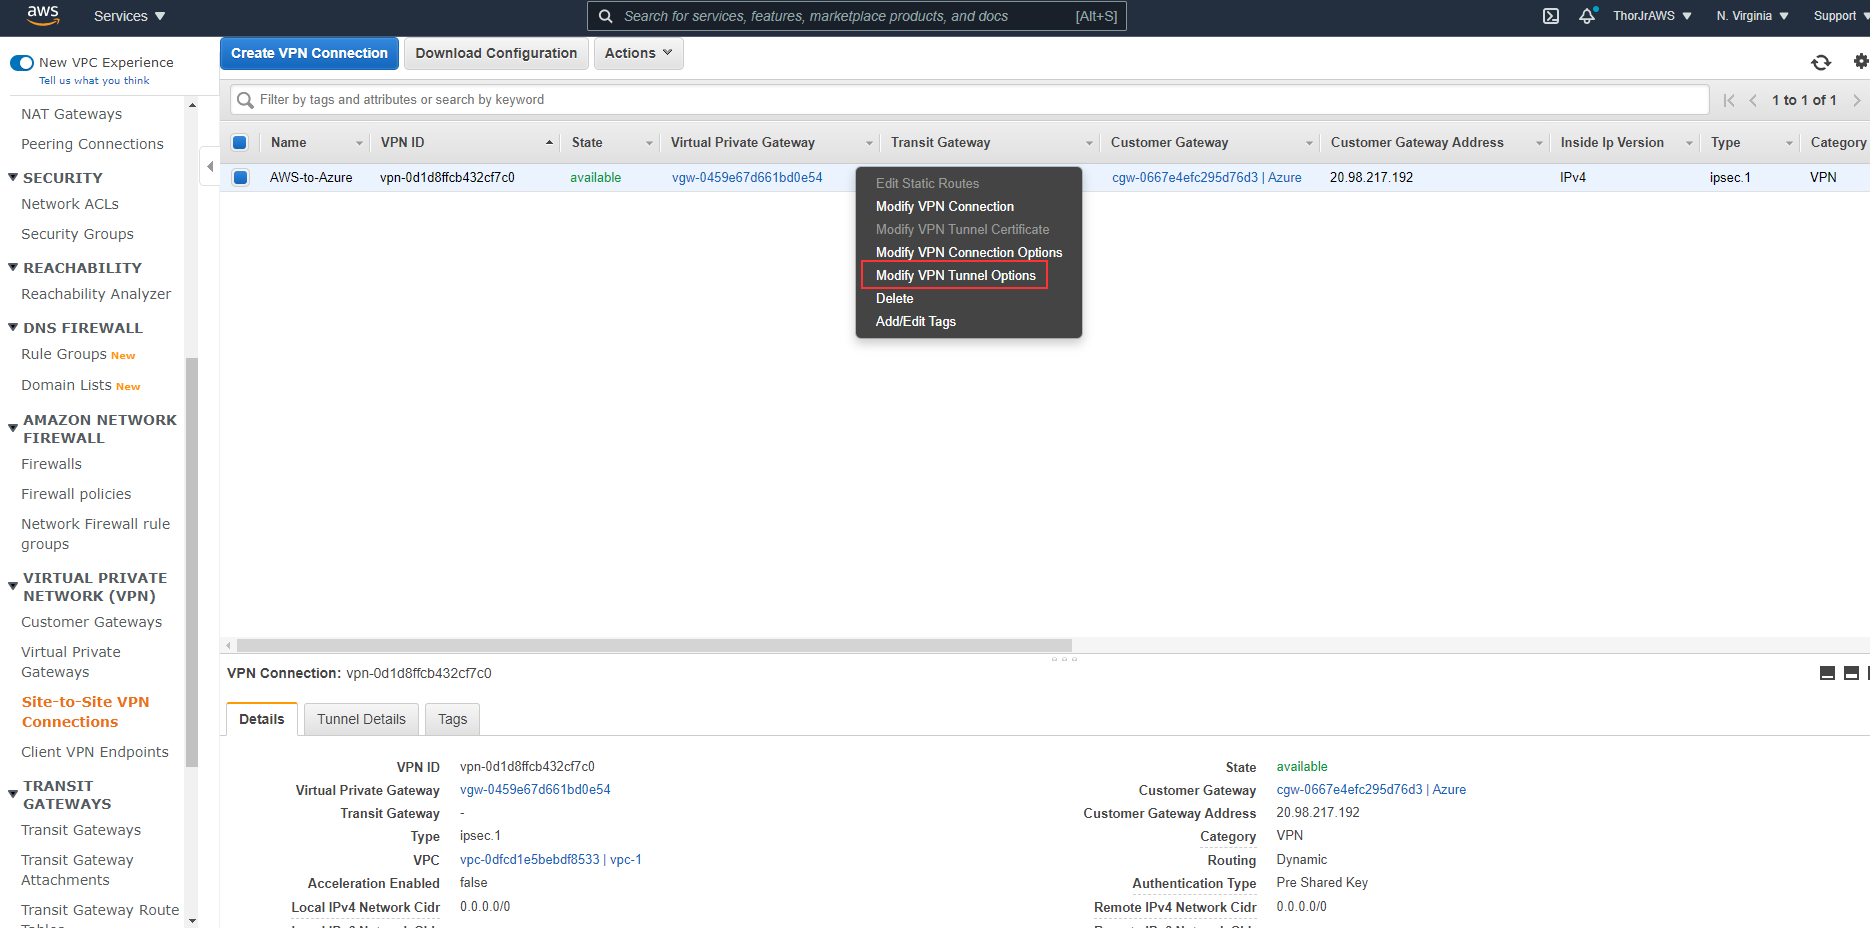
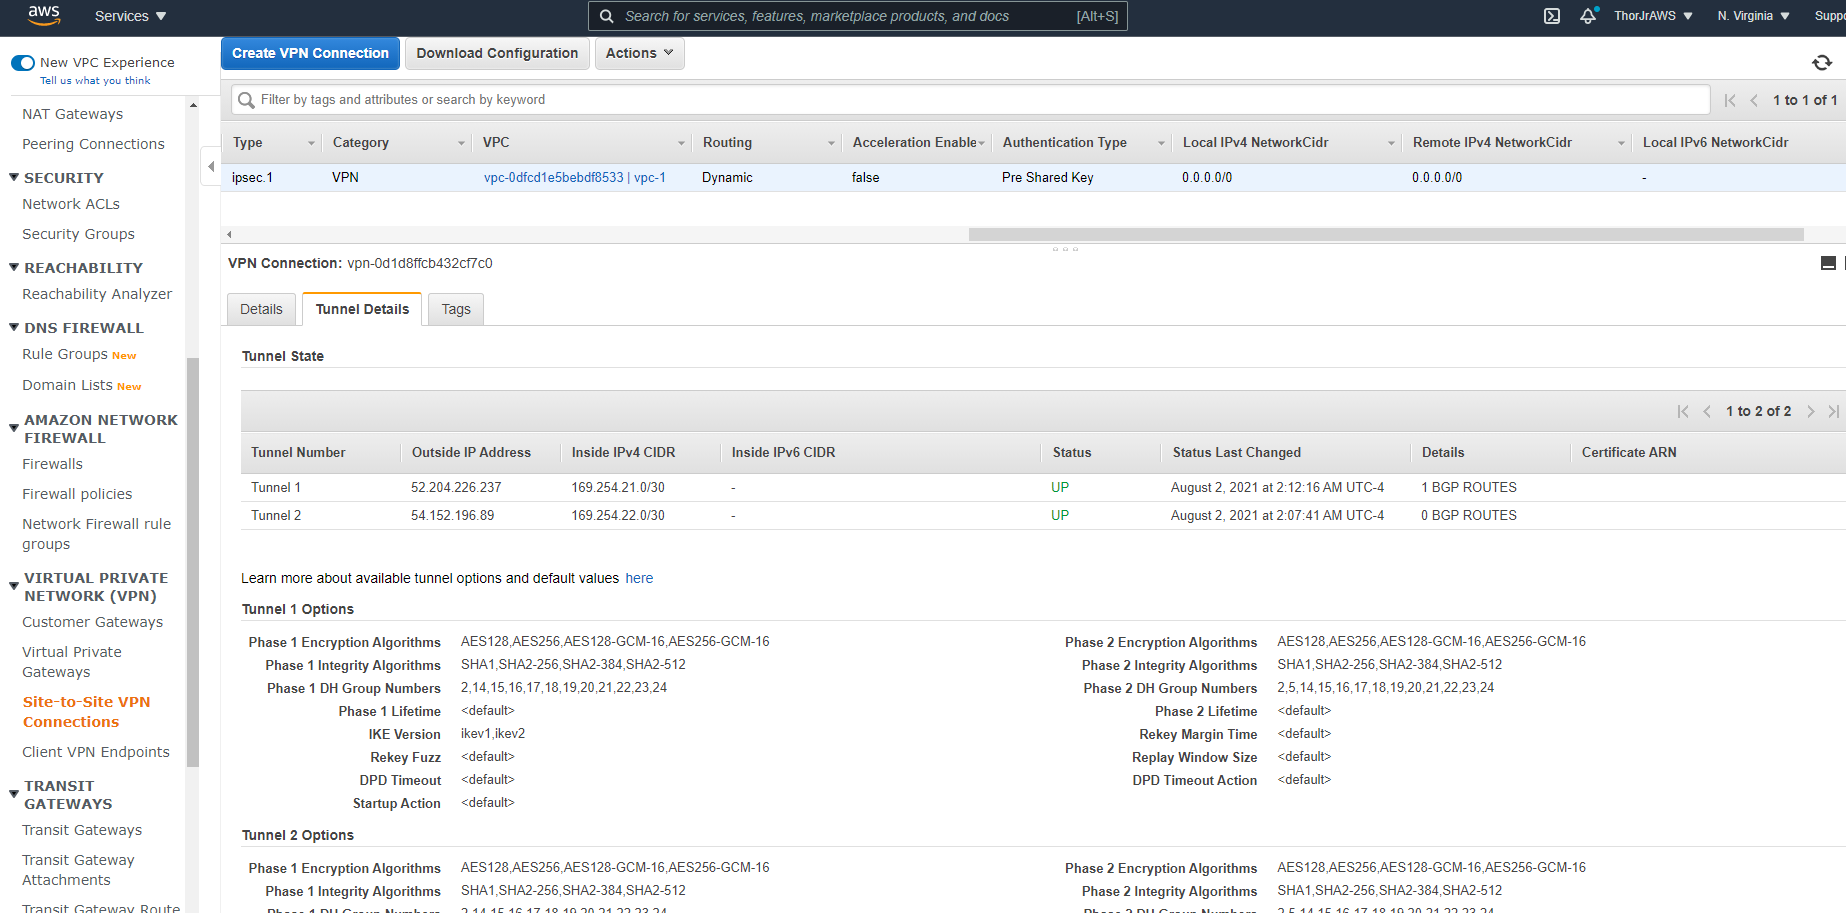
Once our resources are created, we’ll want to stay on the VPC page, use the left pane, and navigate the Site-to-Site VPN Connection. We need to do the two things here: changing the inside tunnel addresses and downloading our configuration and tunnel information.
VIRTUAL PRIVATE NETWORK > Site-to-Site VPN Connections
Right-click on your newly created VPN Connection and select Modify VPN Tunnel Options
```aws cli
Azure BGP IP in the ranges 169.254.21.* and 169.254.22.* while AWS makes you create a /30 CIDR in the 169.254.0.0/16 range. Your tunnel is automatically pulling the first address in the range. In our instance, it will be 169.254.21.1.
Back on the Site-to-Site VPN connection page, press Download Configuration.
```aws cli
From the downloaded .txt file, you’ll want to take note of the following information:
```aws cli
For IPSec Tunnel #1
+(Line 36) Pre-Shared Key : GENERATED-BY-AMAZON
+(Line 111) Customer Gateway ASN : 65000
+(Line 112) Virtual Private Gateway ASN : 64512
+(Line 113) Neighbor IP Address : 169.254.21.1
===================
For IPSec Tunnel #2
+(Line 138) Pre-Shared Key : GENERATED-BY-AMAZON
+(Line 213) Customer Gateway ASN : 65000
+(Line 214) Virtual Private Gateway ASN : 64512
+(Line 215) Neighbor IP Address : 169.254.22.1
Take note of this information in case your side anything was assigned differently. Now, we're headed back to Azure!
## Azure (Part 2)
Navigate to the [Azure Portal](portal.azure.com)
Search for and select `Local network gateways` once the page opens, press create
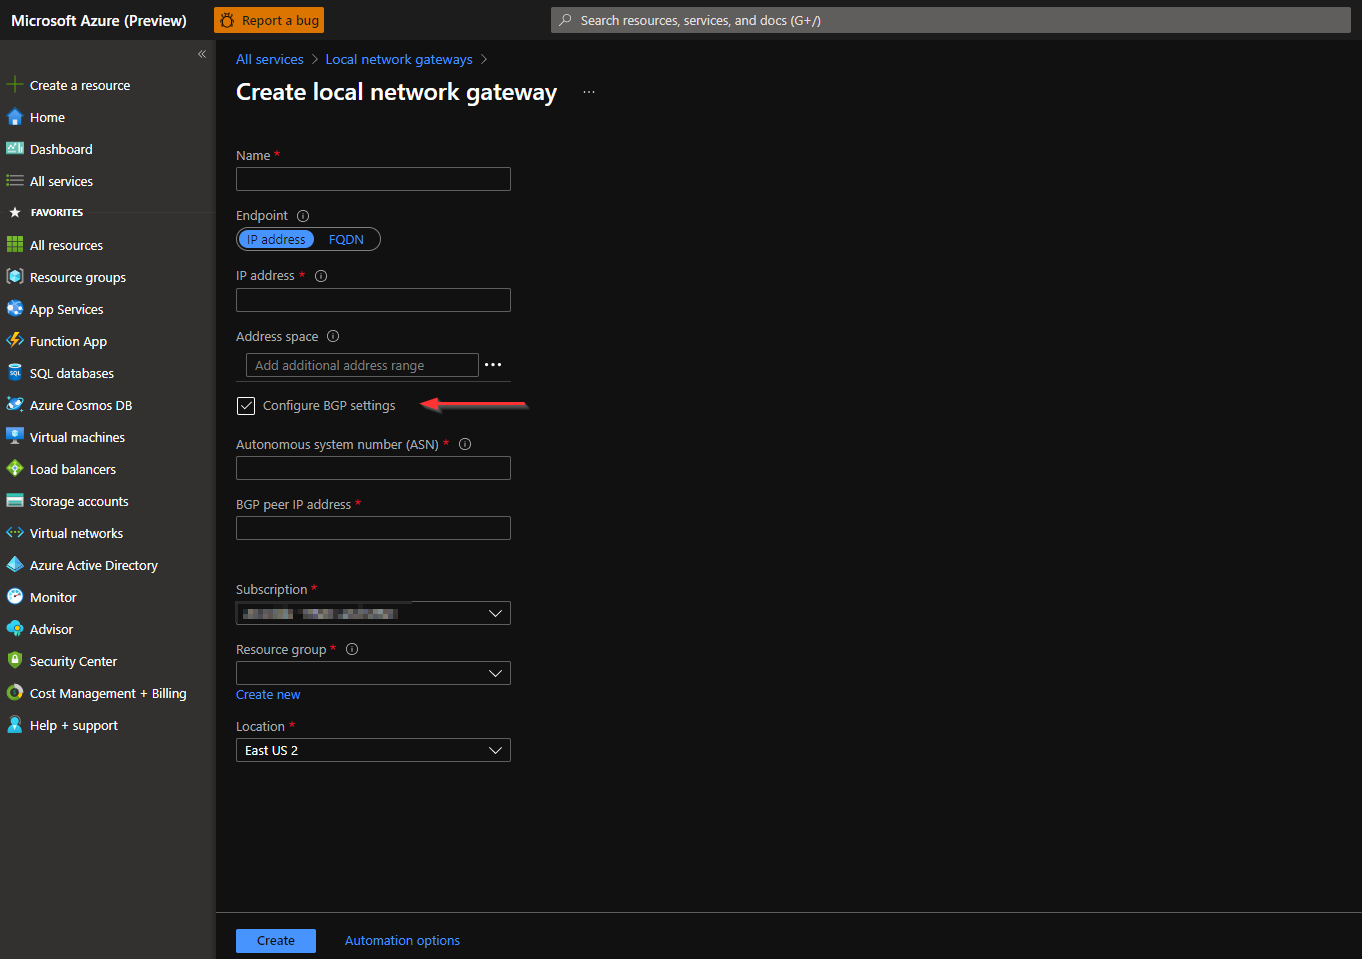
This is where you'll reference the config file that we downloaded from the AWS console.
```aws cli
* Name: Aws-Tunnel-1
* Endpoint: IP address
* IP address: OUTSIDE-VPG-IP<---found in the config file [Interface #1]
+ Address space: LEFT BLANK
+ Check the box to `Configure BGP settings`
- Autonomous system number (ASN): 64512 <-- found in the config file [VPG ASN]
* Subscription: YOURSUBSCRIPTION
* Resource group: rg-1
* Location EastUs2
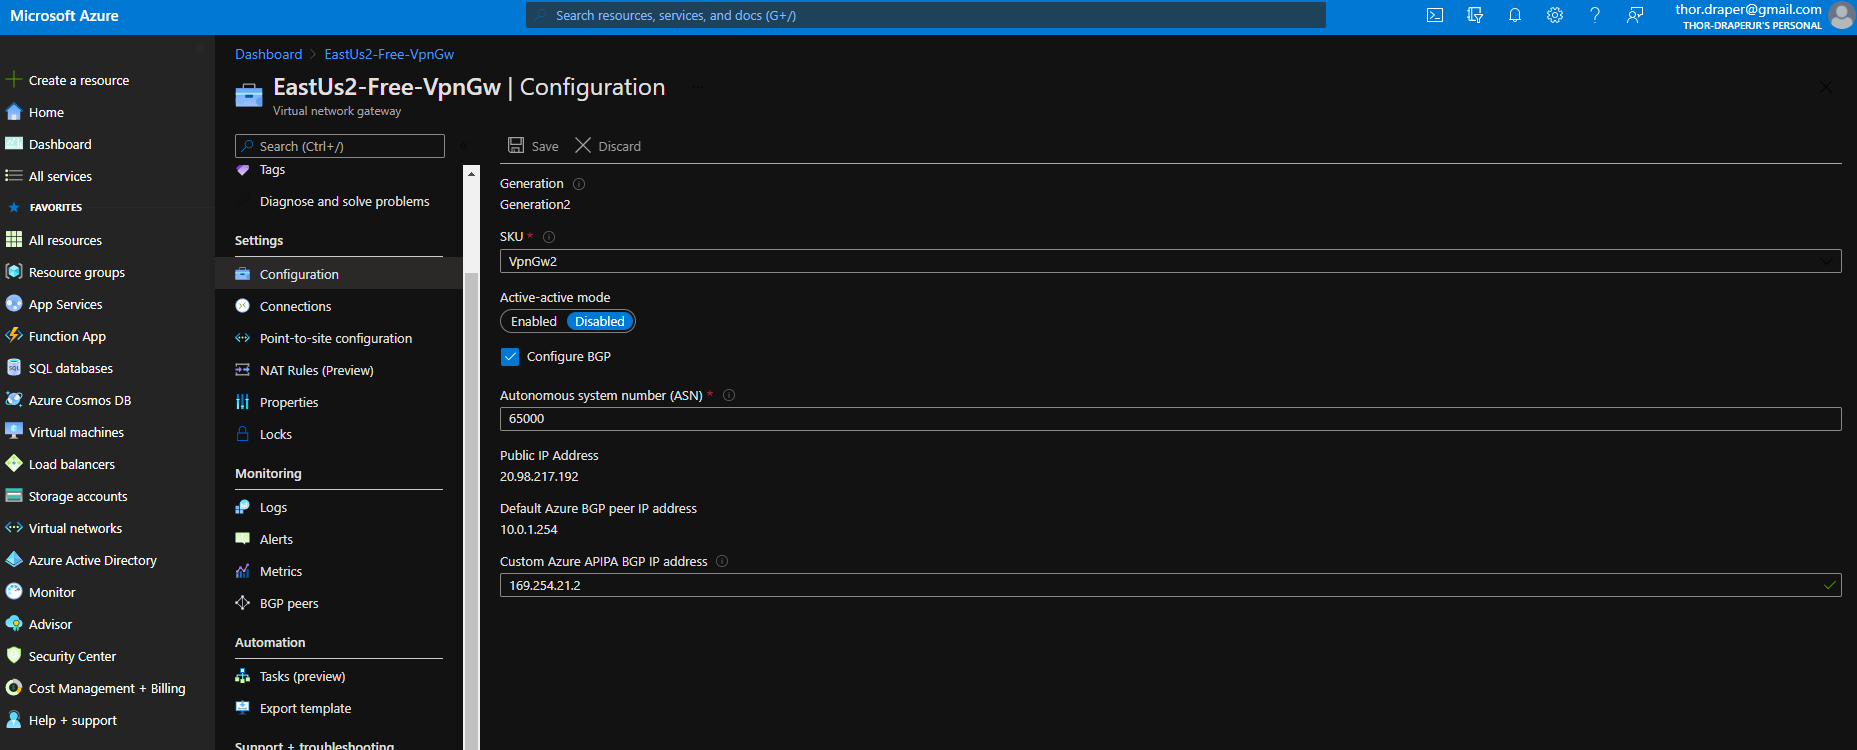
Search for and select Virtual Network Gateways. On the left menu pane Settings, choose Configuration and check the box Configure BGP. Add the Autonomous system number (ASN): 65000 <— found in the config file [Customer Gateway ASN]
```aws cli
Add the Autonomous system number (ASN): 65000 <— found in the config file [Customer Gateway ASN]
- Custom Azure APIPA BGP IP address: 169.254.21.2 <— the next available IP in the /30 in Azure
```
To utilize both tunnels to make this a redundant connection, you’d need to create another Basic SKU Dynamic Public IP address. In your AWS portal, be sure to change Tunnel #2 to another /30 within the accepted Azure APIPA range.
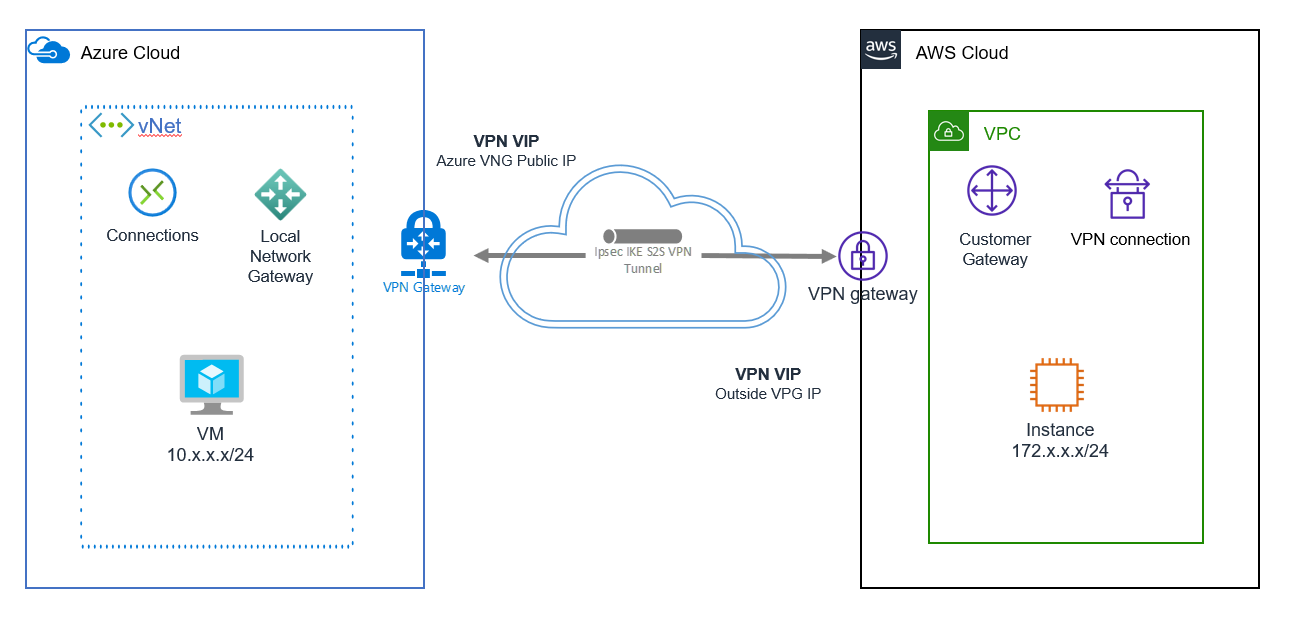
Final Architecture
You should now be able to spin up virtual machines in both cloud environments, and they should be able to ping each other. Keep in mind that you’ll need to allow ICMP traffic outbound to the Instance in AWS.
Troubleshooting
A few areas to check for troubleshooting.
- Verify that you Route Tables are enabling Route propogation.
- If you are trying to ping a resource in AWS make sure that you have the Inbound rule for the subnet of the resource to allow ICMP traffic.
Azure resources
AWS resources