I have a sneaking suspicion that Infrastructure as Code will become increasingly important as time goes on. So, while I have some downtime, I figured I’d start on my journey.
First, let’s define it: Infrastructure as Code (IaC) manages infrastructure (networks, virtual machines, load balancers, and connection topology) in a descriptive model, using the same versioning as the DevOps team uses for source code.
In laymen’s terms: IaC lets you take your deployment templates and deploy them with a command. You can then combine your template with GitHub actions to create your very own CI/CD pipeline to automate the creation and deployment of your projects when you make changes.
The focus of this tutorial is going to be:
- Create your
azuredeploy.json file
- Create your
azuredeploy.parameters.json file
- Set up GitHub Actions to deploy your changes directly into your environment
Step 1: The Greenfield Deployment
You’ll need a few items installed locally:
Once you have everything installed, it’s time to create your local git repository.
mkdir IaC-Pipeline

cd .\IaC-Pipeline\

git init
Next, connect to your Azure portal and create a new resource group for your project. I’m going to name mine “pipeline”.
Connect-AzAccount

New-AzResourceGroup `
  -Name pipeline `
  -Location "East US"
From VSCode, open up a new file and begin typing arm! in the first line.

After pressing enter you’ll have a json file created with templated information.
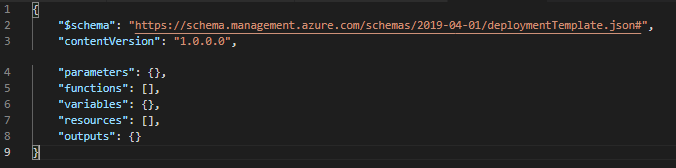
You can start by taking a peek at the templates that are automatically generated in Azure. These are ARM templates. There is also Azure quickstart templates
Next, we are going to deploy a blank template. To do that, we’ll use the Azure PowerShell command New-AzResourceGroup Deployment. The parameters we’ll need to specify are the resource group and a name to the deployment to identify it in the deployment history. Next, we’ll be creating a variable referencing the path to the template file. This is going to speed up the deployment commands from now on.
$templateFile = "{provide-the-path-to-the-template-file}"
New-AzResourceGroupDeployment `
  -Name blanktemplate `
  -ResourceGroupName pipeline `
  -TemplateFile $templateFile
Once that file gets deployed, you’ll have your first IaC deployment into your Azure portal. The ARM template doesn’t have any resources yet, so you won’t see resources created. You’ll see a successful deployment. Now it’s time to add some resources to your portal. In the “resources” line, you can add a curly bracket { and VS Code will prompt you with a list of resources that you can add.
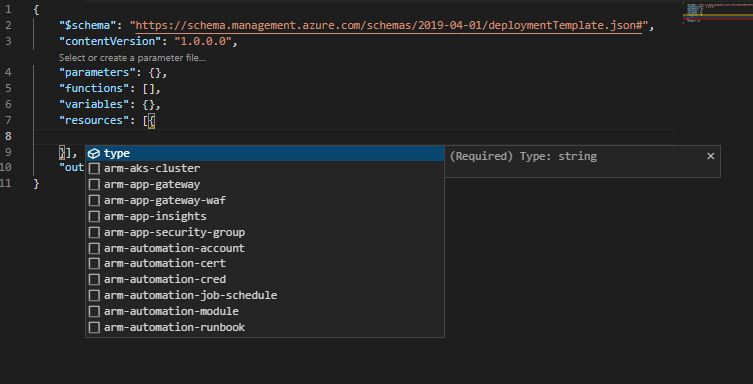
An easy resource would be creating a storage account. The only thing that you’ll want to keep in mind is that the name needs to be unique. (My name is obviously not the most common, so I went with that). Be sure to change the ‘resource’ “name”, ‘resource’ “displayname”, ‘sku’ “name”, and ‘sku’ “tier”. The storage account name must be between 3 and 24 characters in length and use numbers and lower-case letters only.
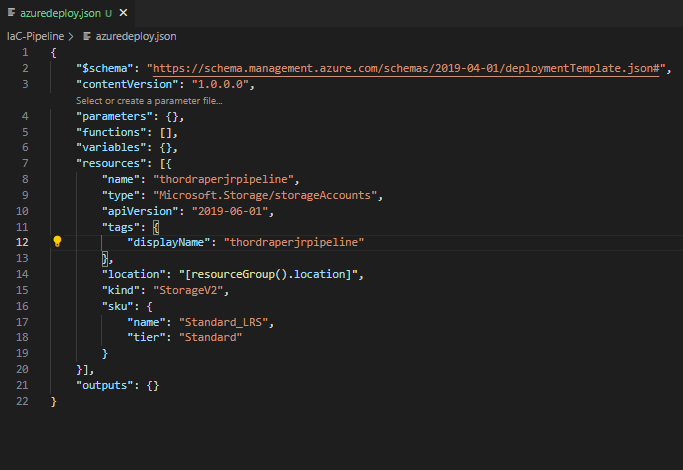
After that, you’ll want to deploy that to the cloud. Save this file as azuredeploy.json and then run the following commands.
Get-AzSubscription

$context = Get-AzSubscription -SubscriptionId {Your subscription ID}
Set-AzContext $context

Set-AzDefault -ResourceGroupName pipeline
This sets your subscription and your default resource group. Next run:
$templateFile = "azuredeploy.json"
$today=Get-Date -Format "MM-dd-yyyy"
$deploymentName="addstorage-"+"$today"
New-AzResourceGroupDeployment `
  -Name $deploymentName `
  -TemplateFile $templateFile
The top section of the code sets Azure PowerShell variables, which include the path to the deployment path and the name of the deployment. Then the New-AzResourceGroupDeployment command deploys the template to Azure. Notice that the deployment name is blanktemplate with the date as a suffix.
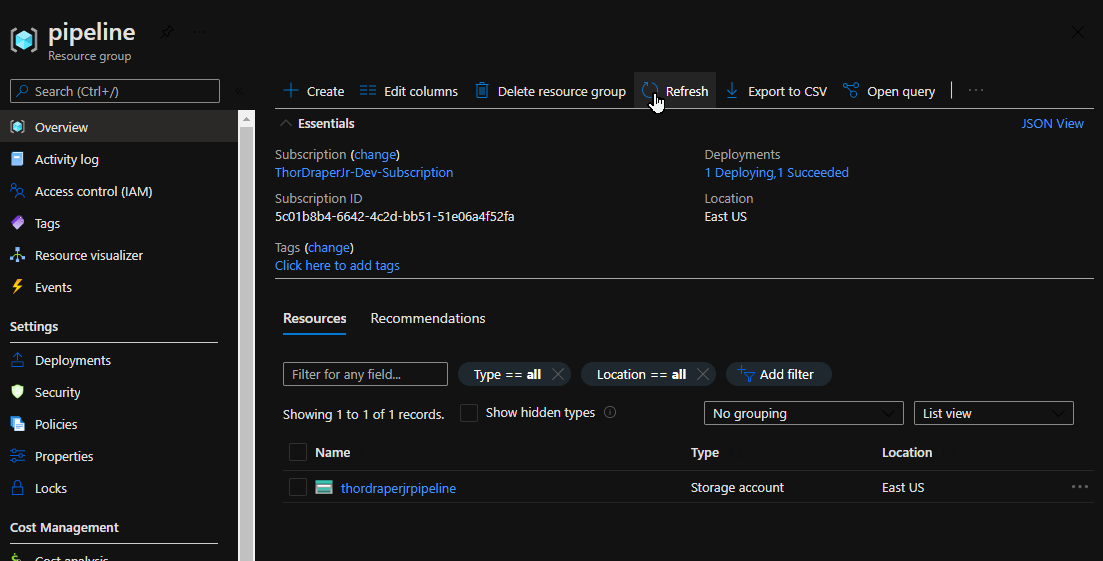
Now you should be able to see your first resource created in the cloud using just the command line to do it. Now it’s time to start learning about parameters. ARM template parameters enable you to customize the deployment by providing tailored values for a particular environment. For example, you pass in different values based on whether you’re deploying to an environment for development, test, production, or others. For example, the previous template uses the Standard_LRS storage account SKU.
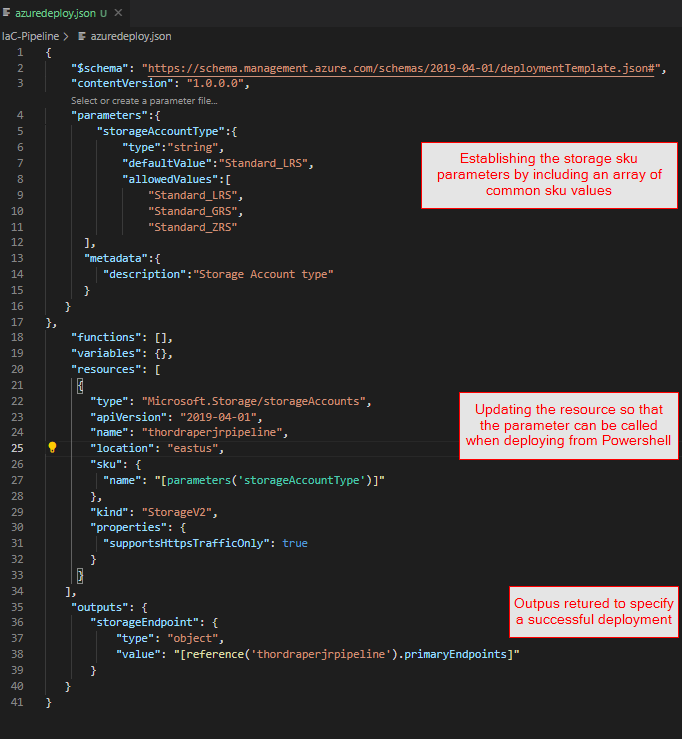
Here I’ve added a few allowed values for the type of storage account my resource can be. I can then reference one of those options in the command line when deploying my template. Notice the last line in the following command:
$templateFile = "azuredeploy.json"
New-AzResourceGroupDeployment `
  -Name testdeployment1 `
  -TemplateFile $templateFile `
  -storageAccountType Standard_LRS
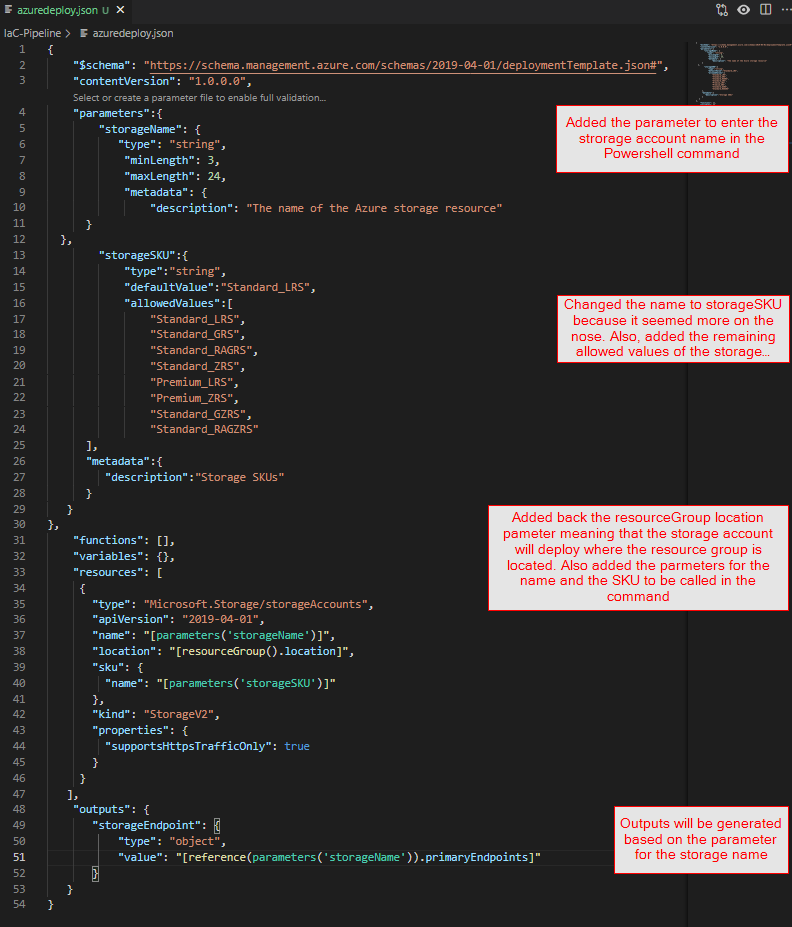
Next, you’ll want to add parameters for the name and the rest of the SKUs. This will give you a new deployment command as well.
$today=Get-Date -Format "MM-dd-yyyy"
$deploymentName="addOutputs-"+"$today"
New-AzResourceGroupDeployment `
  -Name $deploymentName `
  -TemplateFile $templateFile `
  -storageName thordraperjrpipeline `
  -storageSKU Standard_LRS
While this gives you flexibility, it is increasing the amount of manual work you need to do in order to deploy your resources. Next if you want to give a new name prefix you can do that by doing this.
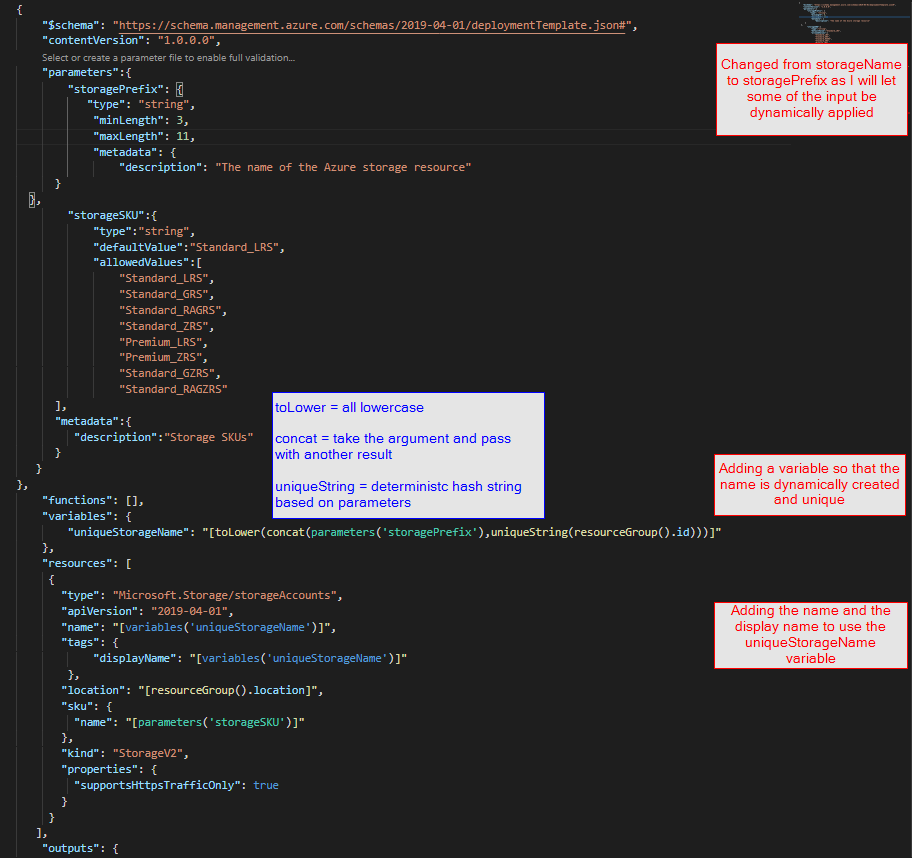
Now you can start using this as your command.
$templateFile = "azuredeploy.json"
$today=Get-Date -Format "MM-dd-yyyy"
$deploymentName="addVariable-"+"$today"
New-AzResourceGroupDeployment `
  -Name $deploymentName `
  -TemplateFile $templateFile `
  -storagePrefix thordraper `
  -storageSKU Standard_LRS
The challenge up to this point is that for every parameter, you’ll need to call out the command specifically, which is a very manual process.
Step 2: The Parameter file
The parameters file follows a similar structure. The only thing that you’ll be referencing in this file is going to be the values that you want to be deployed in your environment.
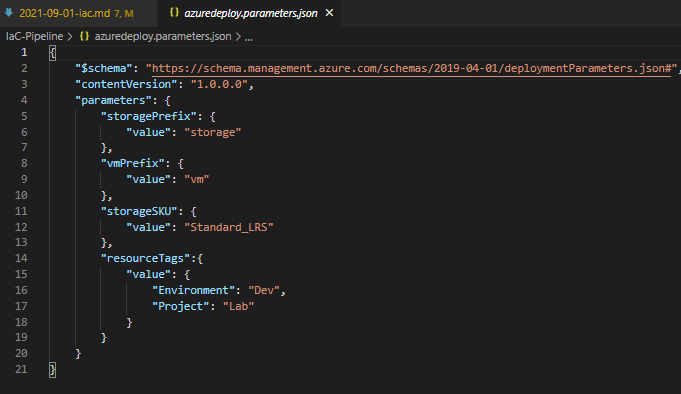
The command to deploy automatically with the parameter file is:
$templateFile = "azuredeploy.json"
$parameterFile="azuredeploy.parameters.json"
$today=Get-Date -Format "MM-dd-yyyy"
$deploymentName="addParameterFile-"+"$today"
New-AzResourceGroupDeployment `
  -Name $deploymentName `
  -TemplateFile $templateFile `
  -TemplateParameterFile $parameterFile
This file will allow you to reduce the length and complexity of the command, but it still requires you to enter it to update your environment manually.
Step 3: GitHub Actions
The last step is going to allow us to upload the repository and files to a GitHub repository. Once you configure authentication between GitHub Actions and your Azure subscription, we’ll be able to update the environment each time a commit is made on the templates.
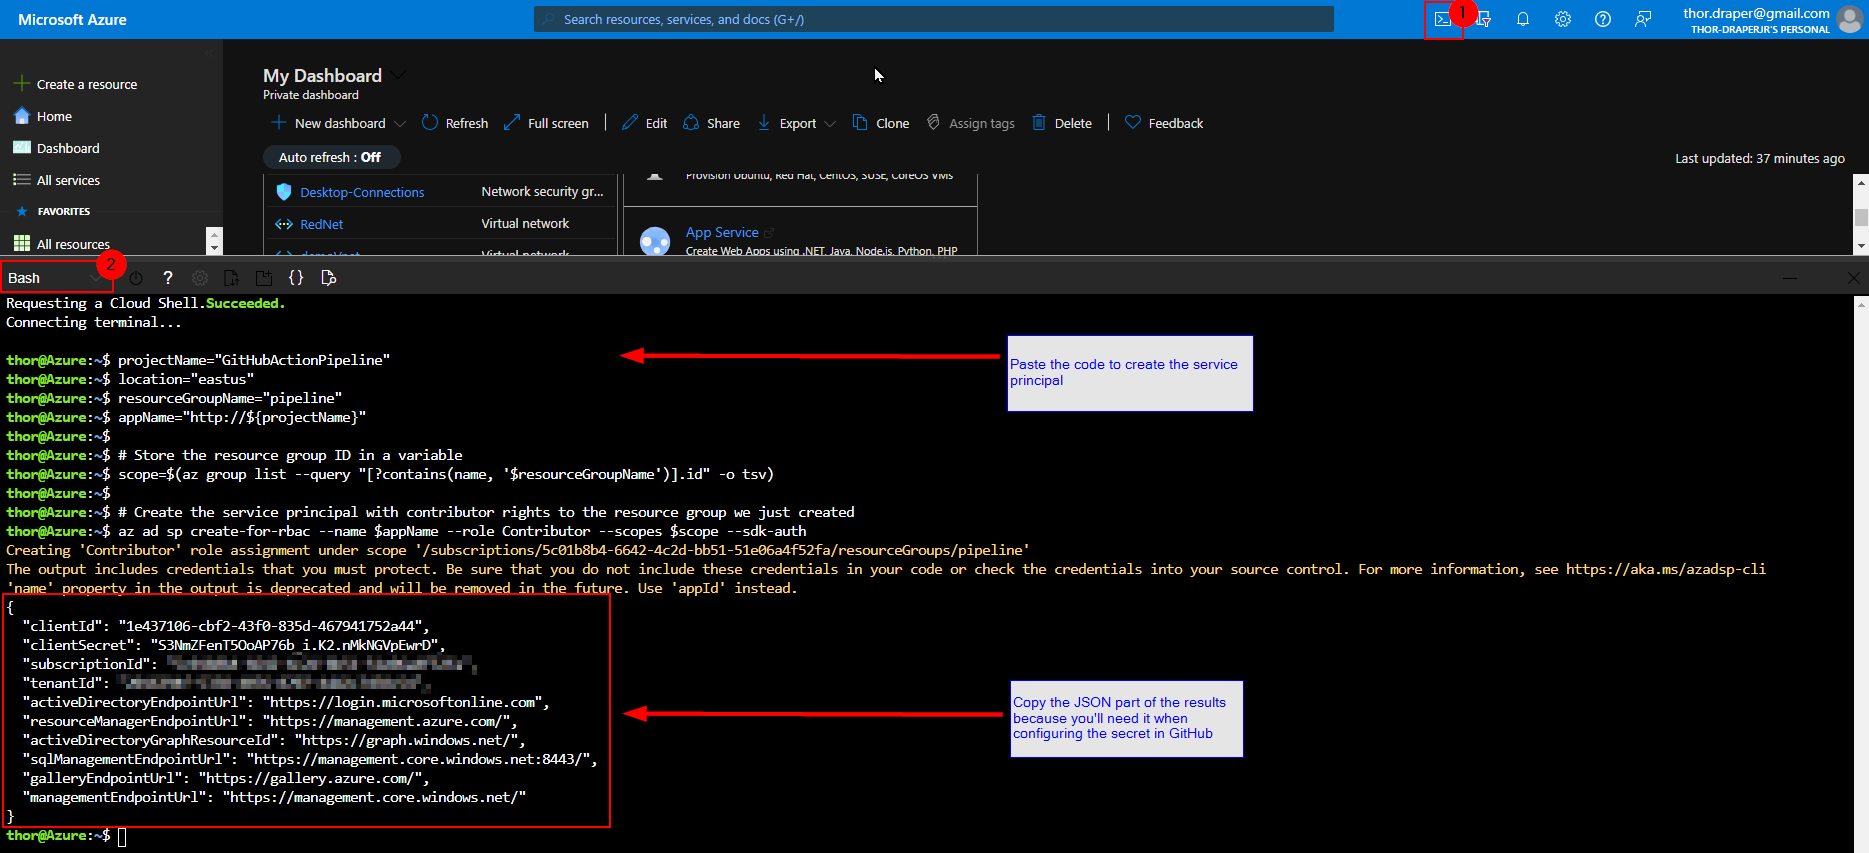
To deploy any resources to Azure using GitHub Actions, you need to create an Azure service principal and give it permissions to create resources defined in your templates. You’ll perform that step in the Azure Cloud Shell section of the Azure portal after you’re signed in to your subscription.
Create the service principal
The principal of a GitHub Actions workflow to deploy Azure resources needs a suitable built-in contributor.
The following Azure CLI script shows how to generate an Azure service principal with contributor permissions in an Azure resource group. This resource group is where the workflow will deploy the resources defined in your ARM template.
```azure cli
projectName=”GitHubActionPipeline”
location=”eastus”
resourceGroupName=”pipeline”
appName=”http://${projectName}”
Store the resource group ID in a variable
scope=$(az group list –query “[?contains(name, ‘$resourceGroupName’)].id” -o tsv)
Create the service principal with contributor rights to the resource group we just created
az ad sp create-for-rbac –name $appName –role Contributor –scopes $scope –sdk-auth
In the portal, while you're signed in to your subscription, select the Cloud Shell icon to open the shell at the bottom of the page.
Open up your GitHub repo and select the following:
1. Settings
2. Secrets
3. New repository secret
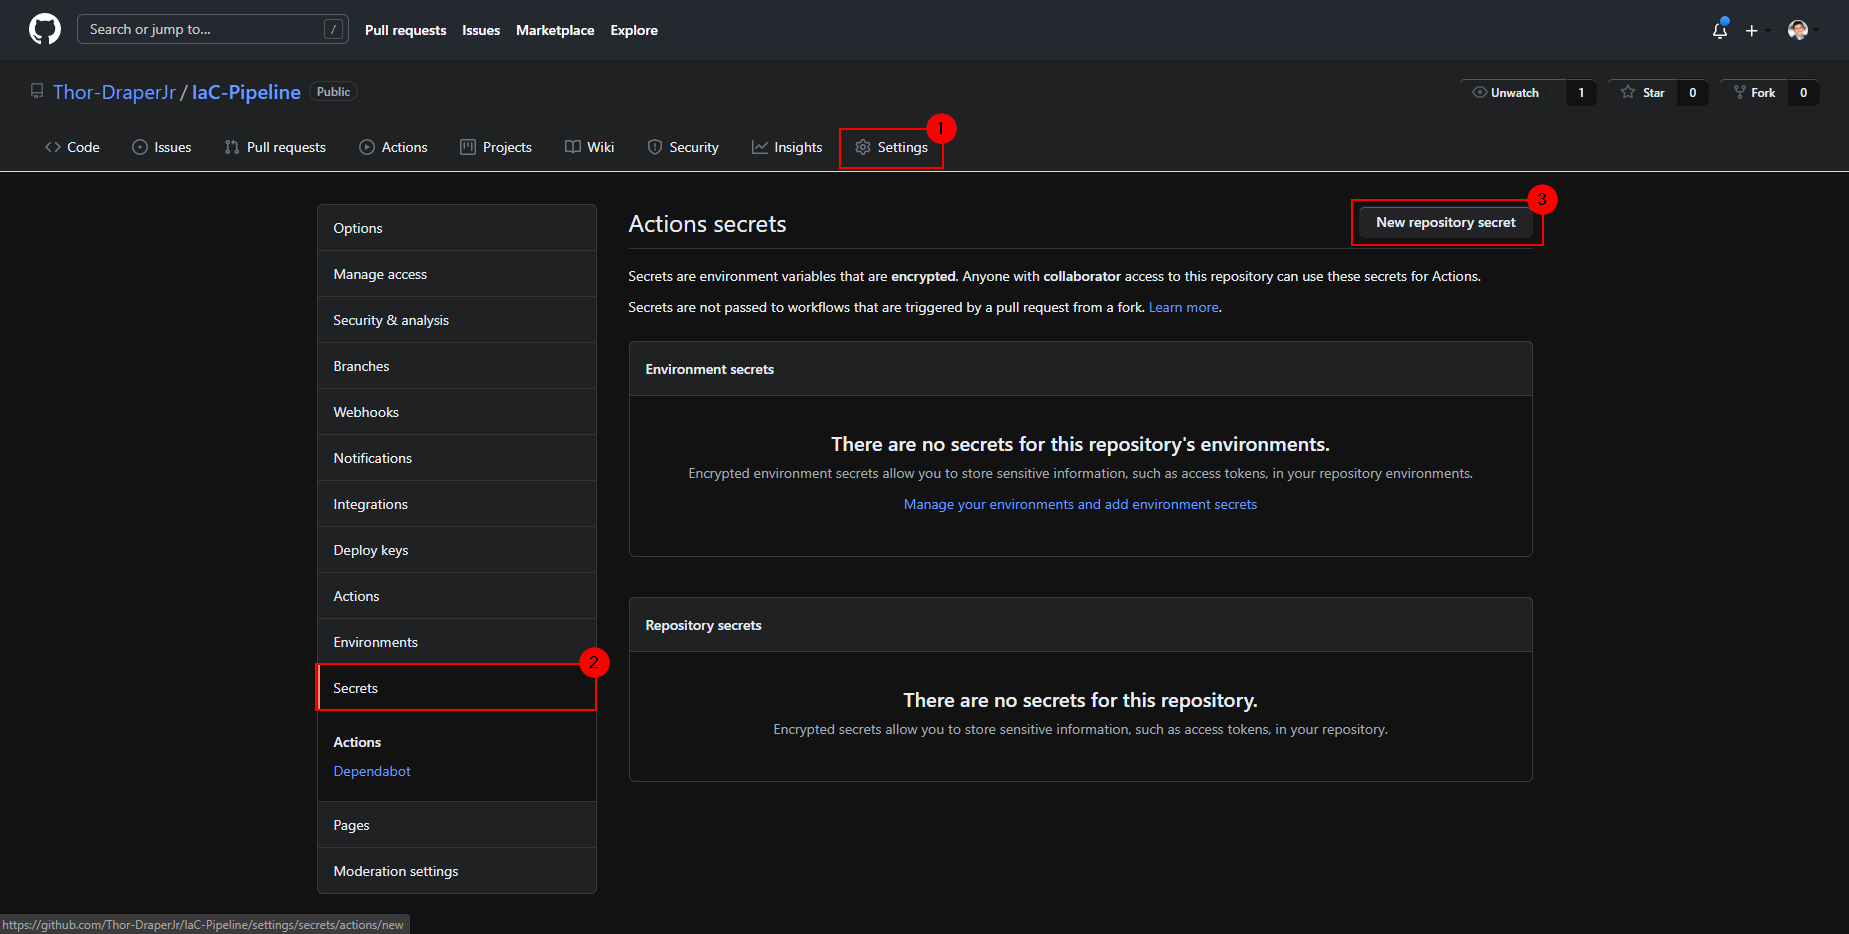
Then you'll paste the JSON you copied from the Azure cloud CLI to the Value. You'll now see an object in the Repository secrets.
### Create a workflow
The workflow file must be stored in the .github/workflows folder at the root of your repository. The workflow file extension can be either .yml or .yaml.
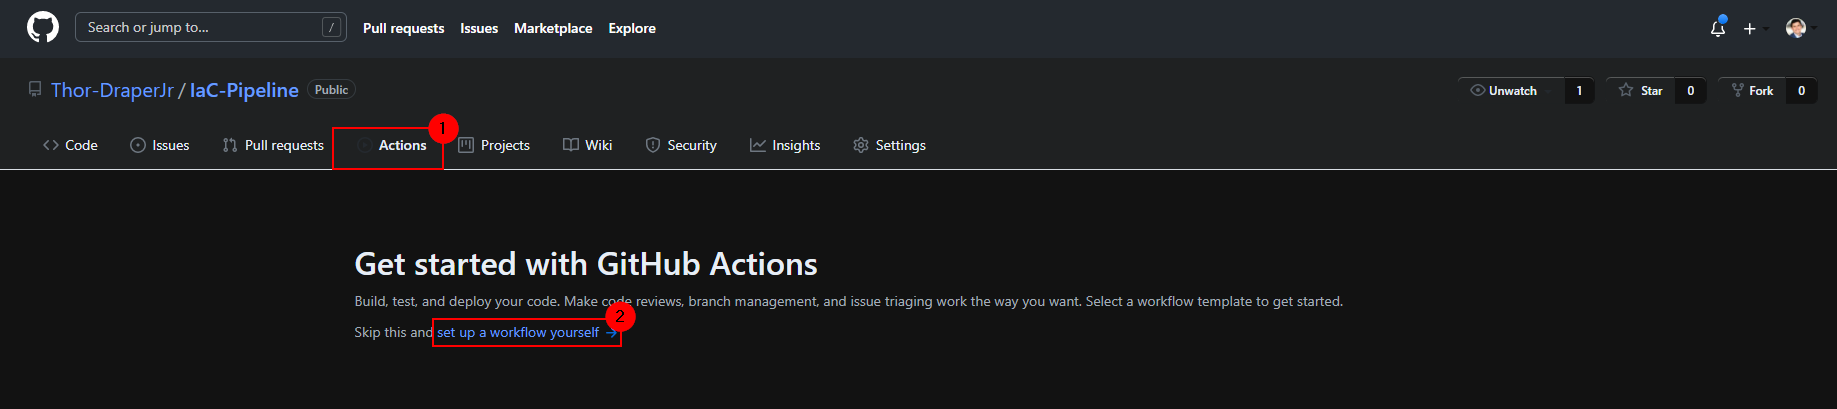
You can create a workflow file and then push/upload the file to the repository. Or you can use the following procedure to create it in the GitHub interface:
Select Actions from the top menu from your GitHub repository and choose Set up a workflow yourself.
### Check your deployment
When the workflow is completed, go to the Azure portal to check the deployment status.
In the left pane, select Resource groups > GitHubActionExercise-rg. On the Deployments pane, verify that your deployment succeeded.
Select Actions from the top menu from your GitHub repository and choose Set up a workflow yourself.
This will bring you to an editor where the default YAML file name is main.yml. Go ahead and change the file to:
```yaml
name: Deploy ARM Template
on:
push:
branches:
- master
env:
AZURE_SUBSCRIPTION_ID: <<YOURSUBSCRIPTION>> # set this to your Azure Subscription Id
AZURE_RESOURCE_GROUP: pipeline # set this to your target resource group
jobs:
deploy-template:
runs-on: ubuntu-latest
steps:
- name: Checkout source code
uses: actions/checkout@master
- name: Login to Azure
uses: azure/login@v1
with:
creds: $
- name: Deploy ARM Template
uses: azure/arm-deploy@v1
with:
scope: resourcegroup
subscriptionId: $
resourceGroupName: $
template: ./azuredeploy.json
parameters: ./azuredeploy.parameters.json
The workflow file has three sections:
- name: This is the name of the workflow.
- on: This is the name of the GitHub event that triggers the workflow. The workflow is triggered when a push event is on the master branch and modifies at least one file on the master branch.
- jobs: A workflow run consists of one or more jobs. Only one job is called deploy-virtual-network-template. This job has three steps:
- Check out source code.
- Sign in to Azure.
- Deploy the ARM template.
Select Start commit. Add a comment and description if needed. Ensure that Commit directly to the master branch is selected, and then select Commit new file (or Commit changes).
After the workflow file is created and committed to the master branch of the repo, the workflow will start automatically because the trigger in your workflow is a commit/push to the master branch.
Go to your repo and check the status of your workflow.
That’s it! You now have your Infrastructure as code. Now you can start adding other resource values and create your lab environment!